The single biggest issue we see when designers present a print file is the failure to include crop marks and bleed.
Designers who are used to dealing with the web may not be familiar with why crops and bleed are so essential, so we figured an article on this subject would be a great idea.
We’ll deal with crop marks first, then we’ll move on to bleed later.
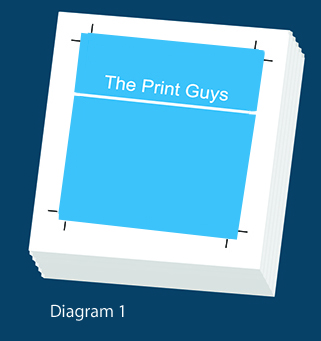 When we print your A3 sized Poster (for example) we don’t feed A3 sized paper through the press – we feed through a sheet that is larger than the finished item. This is because a printing press can’t print all the way to the edge of the sheet – if it did, and if there was some variation in the size of the paper we printed on, ink would end up getting on the impression cylinder and make an awful mess on the reverse side of any subsequent sheets that were fed through, so when we print your poster, the result is something like what we see in Diagram 1.
So the challenge now is that after the job is printed we need to trim those white edges off, to leave you with your job at ‘finished’ size. You’ll hear that term a lot. Finished Size is the size of your job after it has been trimmed to the final size you want it to be.
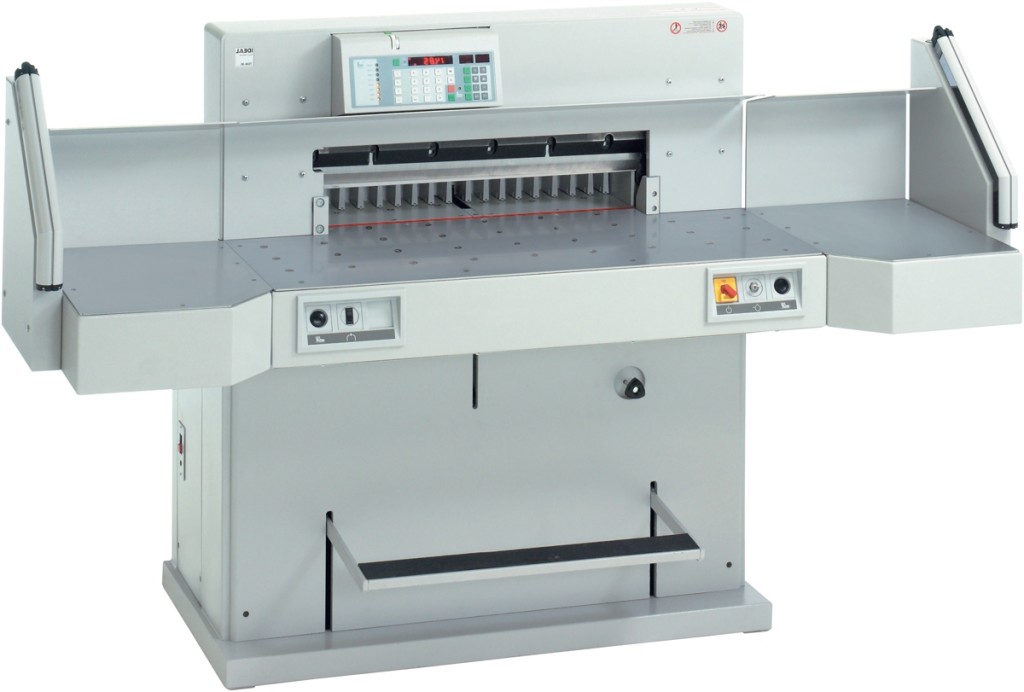
This is a job for our guillotine:
The stack of paper is fed into the guillotine and a very large, sharp blade powers down through the entire stack of paper, slicing off one edge of the stack. Obviously we need to trim all 4 edges so there will be four cuts.
And this is where the crop marks are so important.
In diagram 2 we see our stack of paper repeated 4 times, and in each progressive diagram we’re going to show a dotted line to represent where each cut is made, making 4 cuts in total. 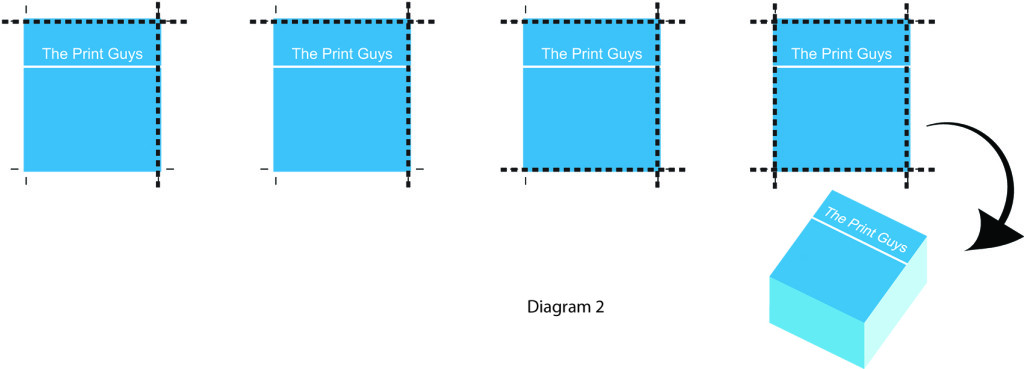 The final illustration shows the final trimmed stack.
Note how crop marks have been cleverly designed to not go all the way to touch the edge of the finished sheet (it’s like their corners are missing)- the reason should be fairly obvious – imagine if they did go all the way and touch where the finished edge was to be, and imagine if there was a slight amount of movement in the sheet – you might see a section of the crop mark in your finished piece.
Now that we understand how crop marks work, let’s take a look at bleed. We’ll start this explanation by talking about fluctuations in paper size and image placement.
Imagine your Poster printed on a sheet of paper, now imagine it on a second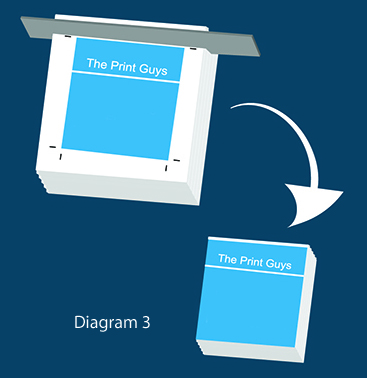 piece of paper, and lay those two pieces one upon the other in a stack. The image on the top sheet will never fall in exactly the same position as the image on the bottom sheet. They’ll be close, but never exact, due to a number of factors, not least being the natural tendency of paper to expand and contract at different rates when exposed to heat and humidity (like we find in a printing press).
In diagram 3 you’ll see our guillotine blade making a cut through a stack of paper.
The designer has intended that the blue background on their poster should go all the way to the edge of the finished page. In this example their blue background finishes exactly on the part of the image that will become the edge of the sheet (after it’s trimmed). You can see that if the blade hits slightly away from the crop mark that the finished page will end up with a slither of white paper on one side.
To solve this problem, you apply what is called “bleed” to the file. That’s where your background image extends past the edge of the sheet. The amount that it extends is 3mm. This means that the image can vary on the sheet by up to 3mm and you still won’t get any white showing on the edge of your page.
You might be relieved to know that fluctuations are likely to be in the vicinity of only half a millimetre or so, but 3mm is accepte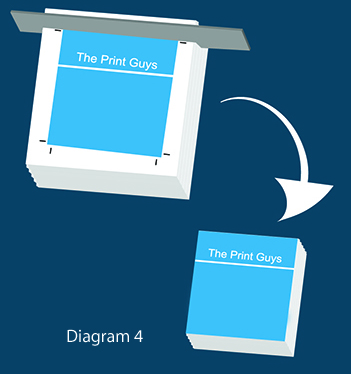 d as the industry standard for bleed allowance.
Have a look at diagram 4, which is fairly similar to the previous one, but it now has bleed applied to the file. (you’ll see the blue extends past where the finished edge will be).
You can see how even if the image moves slightly, that you won’t end up with a slither of white like we did in the earlier example.
When you lay your file up in Indesign, if you’re not used to setting up for bleed you might miss a couple of crucial steps, so we’ll explain a couple of key tricks here.
Firstly, go into File > Document Set up and then choose “more options”. Now add 3mm bleed to all edges and 10mm slug to all edges (Slug is really important as your trim marks will need somewhere to sit and the slug gives it that space).
You can now start laying up your file. You’ll notice on your Indesign page that there is a black border around your page (that’s the finished edge – that’s where the guillotine blade will strike the page) and there’s a red line 3mm further out from the black line. That’s the bleed line – this is where any background that is to bleed off the page must extend all the way out to. The area between the red line and the black line will get trimmed off.
Naturally you need to think about how your final page would look if you put elements of type or other graphics that aren’t a background image right close to the finished edge. For example, you wouldn’t want a line of text sitting right on the edge of the sheet. Your black line is the edge, so make sure you keep critical elements a respectable distance from the edge.
 Now we’re going to export the file to a pdf. There are a couple of settings here that are critical to ensuring the crop marks and bleed come out on the pdf. Go File > Export> and then select to a PDF (Print). We won’t go into all the other settings at this stage, so in the dialogue box that appears, go into the tab called “Marks and Bleed”. Under the “Marks” Heading, tick the box called “Crop Marks”. There are other marks you can select as well, but you only really need crop marks at this stage.
You’ll see there is another section under the “Marks and Bleed” section called “Bleed and Slug”. Tick the box that says “Use document bleed settings” and also tick the box that says “Include slug area”. All the other settings can be left at their defaults, unless you’ve been in previously and have been fiddling with stuff you shouldn’t have.
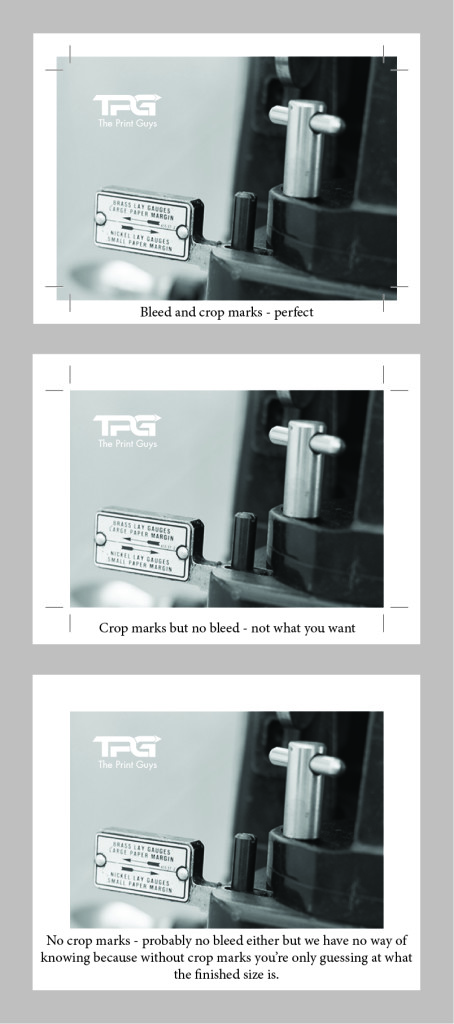
When you click the “Export” button, you’ll end up with a PDF and if you examine it, you should see that you have a page that looks something like the one on the left of Diagram 5, not like the one on the right. You should be able to recognise very quickly the difference between a file that has bleed and crops and one that doesn’t.
If you’re having trouble with any of this, feel free to pop in and have a chat with one of us. We’ll happily give you any help we can. It’s our job to help you create great files, because great files result in great print results.