To illustrate what page creep on a saddle stitched book is, imagine you have a 12 page A5 book. When the pages are collated and folded, you’ll see in diagram 1 that the pages closest to the centre spread extend out further than the pages closer to the cover.
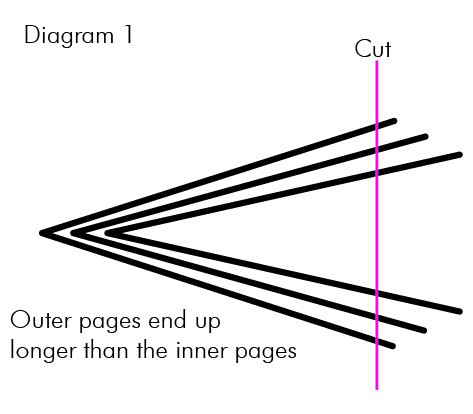
Your book is going to be trimmed after folding to make the for-edge nice and flush, but as you can probably imagine, if there was an element in your design that had been set close to the for-edge, then there’s going to be a problem. The pages near the centre of the book will have that element sitting much closer to the edge of the page than the pages nearer the cover. In fact it will get progressively worse from cover through to centre.
There are two ways to rectify this – the manual process and the automatic process. I’ll describe the manual process first as this is by far the best approach and will allow you to get it perfect.
Begin by making a mock up of your book using the actual thickness of paper your book will be made from. Number each page so you can keep a track of things. Then take a scalpel and make a mark down the edge of the book exactly 20mm away from the fold.
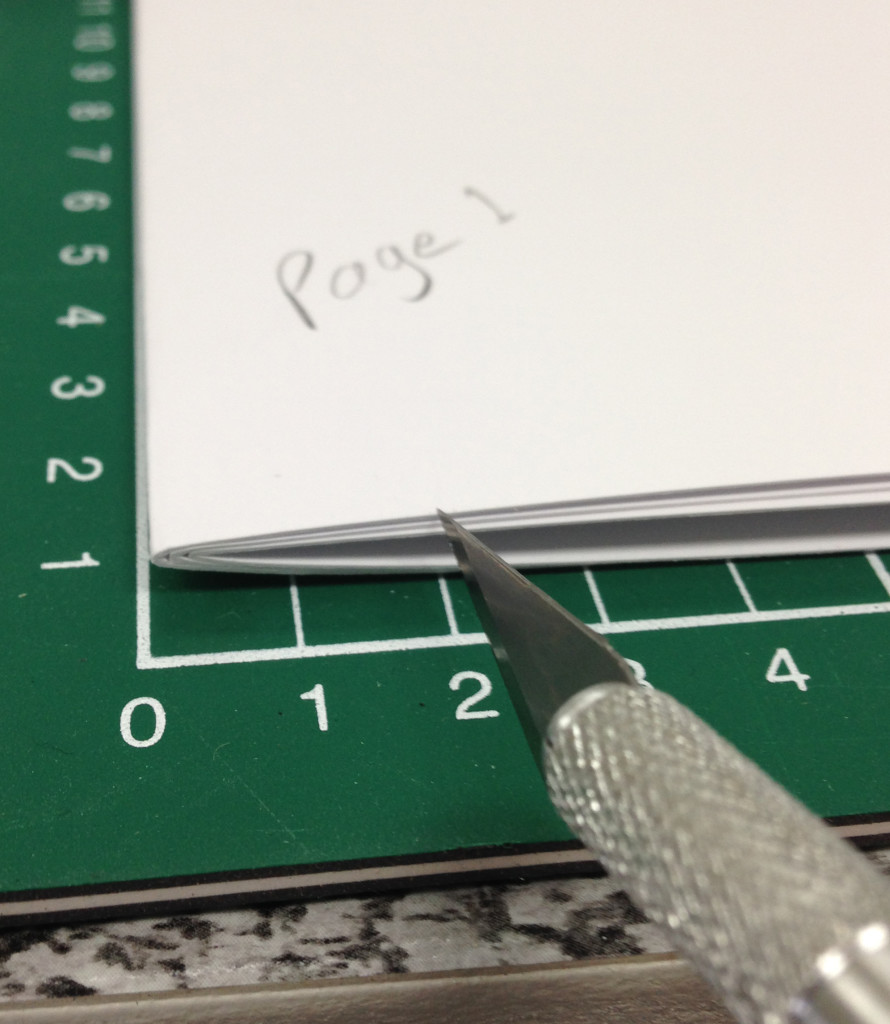
Unfold the pages and measure from the fold out to the scalpel notch on each page.
Now for a little algebra (you can probably see what’s happening here, but in case you can’t, the algebra will allow you to follow blindly along without having to think about it).
X is the width of your page (finished page width) prior to any adjustment. Y is the distance from the fold to the scalpel blade cut. (Y is different on every page so you repeat the calculation for each page)
For each of the pages in your document, do the following
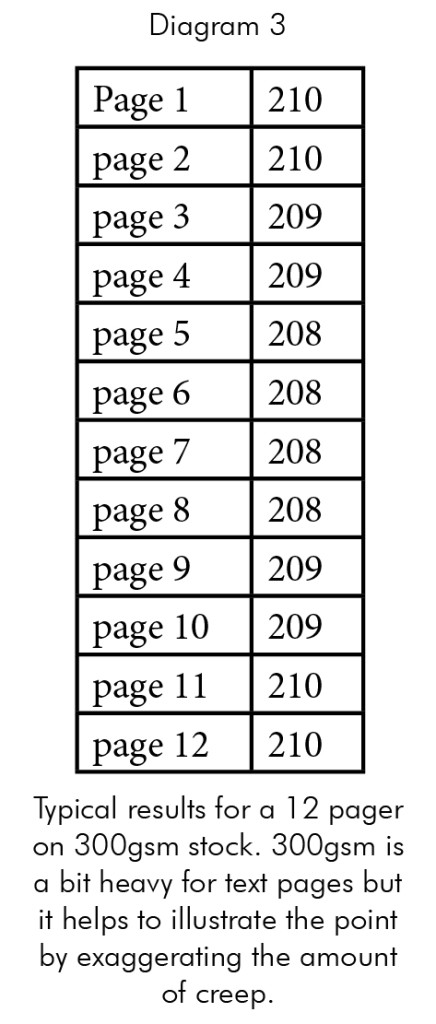
Starting with Page 1, peform the calculation X + (Y-20). You’ll end up with a table of results something like diagram 3.
Now you can go into Indesign and start making some adjustments to your pages. You’re going to add a blue (non printing) vertical guide line on each of your pages at exactly the point indicated by your table of results. (xmm away from the spine).
If our example is a 12 pager, then page 1 and 2 and 11 and 12 (outside front cover, inside front cover, inside back cover and outside back cover respectively) should have the guideline at exactly the finished edge of the book as these pages aren’t affected by creep.
All other pages will have varying degrees of creep – in our example results here, page 3 will have a blue guide line sitting at 209mm out from the spine. Which corresponds with what we would intuitively expect – that this page will be a little shorter than the outside cover pages. Page 4 should be the same as it’s part of the same leaf. Page 5 and 6 will have a guideline at 208mm, meaning they are 2mm shorter than the outer cover pages. Once you hit the centre spread, the amount of creep will have reached it’s maximum amount, so as we would expect, pages 8 and 9 start working back the other way and are longer than the pages at the centre spread, and this trend continues till you get back to the back outside cover.
Now you can go ahead and lay out your design, keeping in mind that the guideline on each page is now the finished edge – accordingly, if you have (for example) a page number on each page, near the for-edge, and lets say you want each page number to be 5mm away from the edge, then you’re page number will be 5mm away from the blueline on each page (not from the indicative finished edge which is the black line in your Indesign lay).
This means you’ll also need to give consideration to the amount of bleed on each page. We will want 3mm bleed on every page. The outer pages are no problem as you can use the red line on your Indesign lay to show you where that is, but on the inner pages you will need to measure 3mm out from the blue line to determine where any backgrounds should bleed to. Of course, you could just continue to use the red line as your bleed guide on the inner pages and that will simply mean that you have more bleed than you need on those inner pages – so long as you are aware of what is getting cropped off, and that’s the whole point of your blue guide line, it shows you where those pages will actually be trimmed.
Of course that makes the job of laying out pages a bit more difficult, but if you want perfect margins, that’s the price you pay. The great thing is, you can save that file and use the same layout every time you do a book with the same amount of pages and the same thickness of paper.
If, through all of that, I’ve lost you and you’re now huddled under your desk rocking back and forth, now’s the time to come out – I’m going to show you the Automatic Method.
Auto creep adjustment is something we do for you at the Pre-press stage, and you don’t even have to think about it, but there are some limitations. Automatic creep allowance only works in limited situations and if you want to have equidistant borders around your pages, or double page spreads with page numbers near the for-edge then auto creep adjustment simply won’t work and you’ll have to revert to the manual method described earlier.
There are two methods of auto creep adjustment – one uses negative values, the other positive values. Let’s start with Positive values. In this situation, the pages near the centre of the book are left exactly where they are and the pages closer to the outside of the book are moved progressively away from the fold.
If we use negative values, the pages near the outside of the book stay where they are and the pages closer to the centre are moved progressively closer to the fold.
If you have an image in the centre spread of your book that spans across the spread, then we would use Positive values (so the centre spread is left unchanged). If you have an image that spans across the cover or inside cover spreads, then we would use negative values.
If, however, there are images that span across the spreads on both the cover and the centre spread then I’m afraid you’re going to have to do the creep adjustment manually. Either that, or avoid having any elements close to the for-edge so the creep doesn’t show up (allow plenty of bleed).
Most booklet designs are fairly forgiving when it comes to creep, and the eye tends to compensate for a bit of unevenness throughout. The Auto Creep will help the situation in many cases, but you do need to be aware that there are some situations (like borders and centre spreads with elements near the for-edge) that will create fairly noticeable issues and it’s these situations where you’ll need to manage the creep at the design stage, not the pre-press stage.
One critical thing to note – if you’re sending us your files for us to apply auto creep, then we’re going to need bleed on ALL edges of your page (to allow for the fact that some pages are moving away from the fold) so it’s really important that you output as single pages (not spreads) and that there is bleed on all 4 edges (some people strip away the bleed on the fold edge). You’ll also need to allow a larger bleed value – an extra 1mm for every 8 pages.
If you do manage your own creep, then be sure to tell us that when you submit your file, that way we will know not to apply auto creep adjustment (that would just ruin all your hard work). And if at all possible, allow enough time for a proof – that will certainly put your mind at rest.